Sunday, April 20, 2008

Last post for a while

We're leaving for Egypt tomorrow! So, that means that this is my last post for the next week or so. I'm gonna miss you guys. :) I'll probably have internet access, but I'm not planning on taking my laptop. I'm going to have PSP withdrawal. :)

So, to tide you guys over, I'm giving you two templates today. Enjoy! :)

Download Template #26 here.

Download Template #27 here.

Saturday, April 19, 2008

Just a little bit of frill

As you have probably noticed, my scrapping style is pretty simple, and I think that's what a lot of you come to my blog for, but I couldn't resist just a little bit of frills today. Granted, it's not nearly as frilly as some scalloped borders out there. It's a simple frill. :) LOL Enjoy. :)

Download Template #25 here.

Friday, April 18, 2008

Countdown to Egypt

3 days until Egypt! I won't be posting templates while I'm gone, but I'll be back soon. Promise. :) We come back on Tuesday the 29th. So, hopefully, I'll be back to posting on the 30th. Hope you all don't miss me too much. :)

Today's template is another first--my first attempt at stitching. Unless there's something I'm missing, it's a little time-consuming. :) Zig zag stitches are easy, but this template called for some straight stitches. Hope you like it!
Download Template #24 here.

Thursday, April 17, 2008

Changed my Header

While I liked the idea of my first header (it looked like a template) it drove me crazy everytime I came here, because it wasn't pretty. So here's my new pretty header. Hope it didn't confuse anyone. :)

Yay! I like this one!

I think this is my favorite template so far. :) I just love having a photo in the middle of a circle with paper forming the rest of the circle. And, I like the journalling following the contours of the circle. One tip to make that easier--allign the text to the right when you're typing on the right side of the circle. Hope you enjoy this template as much as I have. Now I need to get off the computer and take some photos to put in it. :)Download Template #23 here.

Wednesday, April 16, 2008

Check it out!

Check out the new slide show at the bottom of the page. :) Keep those layouts coming! I love seeing them. If you see an LO that catches your eye, run your mouse over it, and you'll see which template the scrapper used so that you can snag it. :)

On a related subject, I just have to tell you how fun it has been creating templates for you all. I have all the comments from the blog sent to my email inbox, and with those, in addition to the other emails I get from you all, I have about 10 emails a day telling me how awesome I am. What an upper! :) Thanks for your support! You totally make it worth it.

Keeping it Simple

On a personal note, thank you so much for all your kind comments about my back. It's feeling better, and a new memory foam mattress topper is on it's way! Hopefully I'll be able to get it all healthy and keep it healthy. :)

It's back to the basics with this template. I'm sure you talented scrappers out there can make something beautiful with it. :) Enjoy!


Download Template #22 here.

Tuesday, April 15, 2008

I'm leaving on a jet plane...

Okay, promise you won't laugh. I'm kind of embarassed to share this template with you. :) I made it because we're going to Egypt soon--next Monday, actually--and I wanted a title page for what I'm sure will be many pages in the scrapbook. So, here's my page and my very silly airplane. :)

Download Template #21 here.

Monday, April 14, 2008

Torn paper

I just love torn paper, don't you? :) I used to use it when I scrapped with paper, and I was so excited to learn how to tear paper digitally. Aren't you lucky? I did all the work for you. :) Enjoy!

Download Template #20 here.

Sunday, April 13, 2008

Playing with Shapes, Part 2

Back again with another template. :) I had so much fun with yesterday's template, I had to try again. Hope you have a use for this one even though it's not even close to Valentine's Day. I just felt like drawing a heart for some reason. :) I think it would look great with a mix of photos and papers. Enjoy! :)Download Template #19 here.

Saturday, April 12, 2008

Brainstorm!

I had a brainstorm just now. :) After spending all that time explaining the part about cropping photos so that they fit better inside templates, I realized that I had been doing something else in other situations that translates perfectly into templates. If you use PSP I hope you can follow this because I don't have screen shots. Here we go.

1. Copy your photo (or paper) that you want to put into the template.
2. Paste the photo as a new layer onto the template.
3. Arrange the layers so that the photo is directly under the part of the template that it goes in.
4. Position the photo how you want it to look (tilt and scale.)
5. Select the template shape. Then, use the magic wand tool to get marching ants around the part of the template that the photo will go on.
6. Invert the selection (Ctrl-I). Now the marching ants are going around the whole page and the template shape.
7. Select the photo layer. Now hit delete. Everything on the photo is deleted, except the part that goes on the template.
8. Select the template layer. Invert the selection again. Hit delete. Now the gray template shape is gone and in its place is your photo (or paper.)
9. If you left part of the template (such as the frame around a photo) you can then right click on that layer on the layers palette and then select Merge-Merge Down. This will merge the frame with the photo so that you can move them together if you want.

This takes a little longer than Ctrl-Shift-L, but it helps to avoid the distortion that can sometimes happen with templates in PSP without cropping your photos ahead of time.

Playing with Shapes

I was experimenting today, and so you get to enjoy the fruits of my experiments. :) If you're an advanced user, why are you using my templates? Just kidding. :) If you're an advanced user, you could journal up the side of the curve. In PSP, you'll have to make a vector curve that matches the curve of the template to make a path for the text. If someone who uses PSP wants a better explanation, I might be able to give a little tutorial. I'm not sure how it works in PS. :) Either way, I think the journalling looks cute sideways like it's shown on the template. Enjoy. :)
Download Template #18 here.

Friday, April 11, 2008

Tutorials

I had one commenter ask about a tutorial for making templates. I could be wrong, but it seems like a lot of designers use Paint Shop Pro. Here's a tutorial for making templates using PSP.

I've also had another request for a tutorial on using templates. Here is a tutorial for using templates with Photo Shop.
But, the request came from someone who uses PSP, and while I know that I learned how to use templates from somewhere, I can't find a tutorial. So, here is my tutorial. I always feel funny writing tutorials because I have just "figured out" so much with digital scrapbooking that I'm afraid I'm doing things the hard way. :) The commenter tells me that she is brand new to digi scrapping, so I'm including a bunch of other tips, too. Okay, here we go.
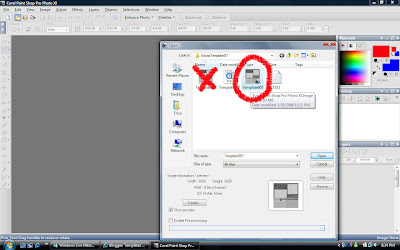
Start by opening your layered template. Make sure you open the .pspimage or the psd. file not the .jpeg so that you have layers to work with. :)


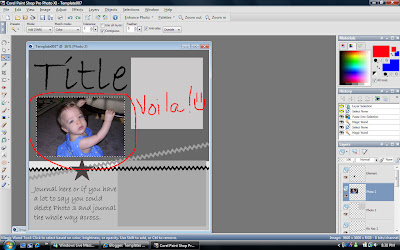
Now, it really doesn't matter which layer you start with, but I usually start with the photos. So, open up your first picture. Then, copy it. Go back to the template. Using the pick tool, select the first photo layer. Then, choose the magic wand tool and click on the photo layer again. You should see "marching ants" around the layer. If it didn't work, check the settings for the magic wand at the top of the screen. It should be selecting by color, and the tolerance should be a low number (try 5). The higher the tolerance, the more the magic wand will pick up. Since this is all one color, you don't need a high tolerance.


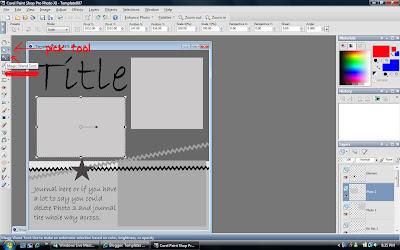
Okay, now, with the marching ants around the place on the template where you want your photo, type Ctrl-Shift-L (paste into selection.) Your photo should now be in the selection box.


Magic. :) Type Ctrl-D to get rid of the ants.


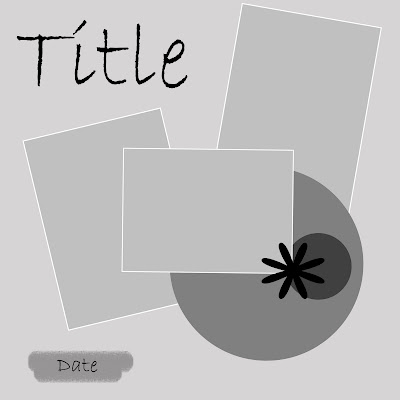
Now, for the square photo at the top of this template, I need to select my next photo, but so that the photo doesn't get distorted, I need to turn that photo into a square. So, I use the crop tool. What I'm showing you in this screen shot is that you can tell it's a square because the crop tool tells you the measurements. That's something handy that I didn't notice until recently. :)Now, once I cropped the photo, I copied it. Then, I used the magic wand to select the square on the template, and pressed Ctrl-Shift-L again. Don't forget Ctrl-D to clear the ants. It's that easy! :) I suggest that you don't close the photos until you're completely finished with the LO, just minimize them. Just in case.


It works the same way with the papers. Just copy the paper. Select the layer on the template. Use the magic wand to get the marching ants. Hit Ctrl-Shift-L. Hit Ctrl-D.

Now that I've been staring at the Template for a little while, I pretty much know where things are, so I delete some layers that I don't need. In this case, the text, star, and ribbon, because I'm going to replace them with my own. You can delete a layer two ways: on the layers palette, right click on the layer and then choose delete, or right click on the object and click delete.

Then, add elements just like any other LO.

Okay, that's the main part of the template tutorial. Here are some tips for finishing up the layout.


When you add a new element, it might not be in the order that you want it to be in, you can move them around by right clicking, click arrange, then choose where you want the element to go. Or, you can actually move them around on the layers palette; just click and drag.


Normally, I would delete the ric rac in my template and replace it with a ric rac that a designer made (because they do things to make it look more realistic), but in the interest of showing you some other handy tools, this is what I did this time. In the right hand corner, you'll see two color boxes. Click on the top one and a menu that looks like this will pop up:


You're mouse will also look like a dropper. Use the dropper to pick up a color somewhere on the page. This is a great way to make sure that your journaling matches your LO exactly. Click okay. I've also circled the ric rac because you can see that I've selected it with the magic wand. Now, I use the paint bucket (flood fill) tool and click inside the marching ants and my ric rac turns blue. :)


Finishing touches, drop shadow:


The zoom is always way too close. Usually something around 5-10 works much better. As far as settings, for most things I use a number between 4 and 6. I might go up to 8 for something that is obviously thicker, like chipboard, but anything higher than that, and it looks like it's floating off the page. Make sure that the box next to shadow on it's own layer isn't checked. That's annoying unless you need it to be a separate layer for some reason. Also, I never add a drop shadow to my text layers.


Make sure you choose "save as" to save your LO, otherwise you'll save over the template and you won't be able to use it again.


Hey! This is fun!

I just have to tell you all that this is so much fun. :) I love making templates, thinking of all the ways that a template could be used, imagining how people could take my ideas and run with them. I hope I don't run out of ideas. :)

You know what would make it even better? Seeing your LO's. I'd love to have you email me with your LO or a link to your LO. If I get enough, I'll start a slideshow to show them off on here. I really, really, really would love to see what you do with my templates. :)


So, here's the newest. You can use the flowers if you want to, but my intention was to show you places to squeeze in some elements. I also added an overlay that you can change to any color you'd like. Use the magic wand set at a high tolerance (I tested it at 50) to select it for recoloring.
Download Template #17 here.

Thursday, April 10, 2008

Template #16

Okay, so yesterday I gave in to my symmetrical side, and today I fought it off to make this template. And, I have to admit that while I think I'm going to like things symmetrical, it's really not as pleasing to the eye as other kinds of balance. Anyway, enough of the theory, here's the template.

Download Template #16 here.

Wednesday, April 9, 2008

Template # 15

Here's a template for an LO with a lot of pictures. I gave in to the side of my personality that wants everything to be symmetrical with this one. But, if you aren't a fan of symmetry, you could always delete one of the pictures and add an element or two in it's place. This template probably won't work for many people as is, but I think it's a great jumping off point. :)


Download Template #15 here.

Tuesday, April 8, 2008

Template #14

Just a simple layout, but I love the look of curled photos. :) I don't have an example. Use your imaginations. :)

Download Template #14 here.

Monday, April 7, 2008

Oops!

The link for Template #13 (Side B) has been fixed below. To the 8 people or so that already downloaded it, sorry! Thank you to the anonymous commenter that pointed out my mistake.

Two Pager

I made the first template with our trip to the beach in mind. Then, we went and I got a few shots that I wanted to scrap, so I made the template for the second page. Here's my layout:
Credits: Papers, chipboard fish, and tab from Day at the Beach by Julie Kelly, other elements (recolored) from Charlie's World by Candee (Mermaid's Haven)

And here are the templates. As far as the swirls, they're okay, but you probably have better ones in your stash that you can replace them with. :)

Download Template #12 (side A) here.

Download Template #13 (side B) here.

Enjoy! :)

Sunday, April 6, 2008

Template #11

You might have seen that I posted this about an hour ago, with an unfinished layout, because I was stuck. But, posting it guilted me into getting it finished. So, here's my favorite boy:
Credits: My Favorite Boy freebie by Jill D-Zines, arrow by Gina Cabrera, star from Playground Pop by Peppermint Creative

Download Template #11 here.

Enjoy. :)

Saturday, April 5, 2008

Bits and Pieces

The freebies for today are not full page templates, but they could make your scrapping life a little easier especially when you would like a matching tag or flower, but the designer didn't make one.
First here's the stacked flower template. I made a button center, but I would recommend deleting it and using a button from your own stash; it's not the most realistic digital button I've ever seen. :) The flowers do need a little work to look less flat. Using the dodge tool with a soft brush with opacity around 25, lighten the centers of the petals. Then, use the burn tool at the same settings to darken the edges. You could also experiment with it the other way around, which would make the petals look bent in. Then, don't forget to put a drop shadow under each layer to make it even more realistic.

Download Stacked Flower Templates here.

Next is my tag template. It includes both a two paper with ribbon tag (as shown in the preview) and a plain tag. Sorry the string doesn't have a knot in it; I couldn't make it look right. So, I would recommend putting a staple or other fastener at the place where the two ends meet. :)

Download Tag Template here.

Hope you like these templates! Thank you for all your kind comments.

Friday, April 4, 2008

Template #10

I'm in the double digits! :) I based this template on a paper LO that I saw posted online. Here is my version:
Isn't that adorable? She was so tired she fell asleep while she was eating. And, since I'm me, I couldn't resist taking her picture for the scrapbook. :)
Credits (Paper strips numbered from the top): Background, PP #1, PP #4, folded ribbon and flower from Sweet Pink from G Mendes. PP #2, journal box pp and patterned ribbon from Lady Magdaline by Brent Boone. PP #3 and #5 from Sara Carling's Sweet Rubbish. PP #6 from Sweet Sprinkles by Shabby Princess. PP #7 from Groovy Girl by Carrie Stephens. Font is CAC Pinafore.
Download Template #10 here.

Thursday, April 3, 2008

Best of Template and I can't help myself!

I am absolutely in love with this 2 page template and the layout that I scraplifted to create it. It's a template to scrap baby's first year or any year or anything where you have A LOT of pictures. :) I knew I was going to run out of shades of gray for this template, so I went for the color study look. :) Now, when you put all those squares on one page it makes for a lot of layers, which can make your program run slowly. So, I've got two different downloads, one with each photo square on it's own layer, and one with the photo squares merged into one layer. If you think you would like to move them around, then download the first one. If you like the way it looks exactly the way it is, download the second one.

Download Template #9 with separate photo layers here.
Download Template #9 with less layers here.

Here's the LO that I used to make the template, made by my friend Lucy, a very talented scrapper. :) The only change I made in my template is an allowance for the little bit in the middle that is hard to see when it's printed in a book. Lucy actually scraplifted the LO from Kim Haynes as featured in "The Ultimate Guide to Digital Scrapbooking 2007." The kit is Wild Sorbet by Michelle Coleman, and the font is 1941 Report.

So, even though, like I said before, I have no idea what I'm doing when it comes to designing, I just can't seem to help myself! I was messing around with drawing this puppy, and soon he was a whole mini kit. I certainly would never charge anyone for my attempts at designing, but I thought, for free, you might appreciate them. :) So, here it is, Puppy by Erica, a mini-kit.

Download Puppy kit here.

Wednesday, April 2, 2008

A List of Scrapbooking Links

This is a list of scrabooking links that was compiled by a wonderful group of digi-scrapping mommies on BabyCenter.

Our Links compiled by Colette
http://www.freedigitalscrapbooking.com/digital_scrapbooking_freebies.html
http://www.cgessentials.com/FreebiesPage.asp
http://www.designerdigitals.com/ddgallery/showgallery.php?cat=531
http://www.digitalscrapbookplace.com/place/freebies.shtml
http://www.scrapbook-bytes.com/chat/local_links.php?catid=5
http://www.scrapartist.com/gallery/showgallery.php?cat=538 http://www.shabbyprincess.com/downloads.asp
http://www.simplycleandigiscraps.com/freebies.html
http://www.digitalfreebies.com/
http://peppermintcreative.com/index.php?main_page=downloads http://www.scrappindigikreations.com/shop/index.php?main_page=index&cPath=11&zenid=fe189b1d733cd010750c1194c3237f80
http://www.digiscrapdepot.com/freebies/
http://digifree.blogspot.com/
http://ikeagoddess.blogspot.com/
http://jilljackscraps.blogspot.com/search/label/freebie
http://www.mydigitaladdiction.com/
http://jencaputo.typepad.com/photos/sketches/index.html
http://store.scrapgirls.com/category.php?cat=21
http://www.digitalscrapbookingfreebies.com
http://valarieostromdesigns.blogspot.com/
http://twopeasinabucket.kaboose.com/shopping.asp?f=506_c_336&c=24
http://shutterfly.typepad.com/digiscrap/

A little bit of everything (freebies/$$ kits/tutorials, etc…)http://www.scrappysketches.blogspot.com/
http://www.cgessentials.com/Index.asp
http://www.designerdigitals.com/
http://www.digitalscrapbookplace.com/
http://scrapbook-bytes.com/
http://www.scrapartist.com/index.html
http://www.shabbyprincess.com/default.asp
http://www.simplycleandigiscraps.com/
http://www.thedigichick.com/
www.pepermintcreative.com
http://www.scrappindigikreations.com/
http://www.digiscrapdepot.com
http://www.atomiccupcake.com/
http://cottagearts.net/tutorials.html
http://twopeasinabucket.kaboose.com/default.asp
http://scrapwithnatali.blogspot.com/
http://www.scrapgirls.com/?gclid=CM3l34_QipACFQ2aOAoddCsctg

Tutorials
Siggy Making (it has a lot of things you can learn tho for SB)http://messageboards.ivillage.com/n/mb/message.asp?webtag=iv-prsigshownew&msg=4863.1&ctx=0
http://jenjen.typepad.com/digiscrap/2005/08/table_of_conten.html
http://www.hummiesworld.com/Tutorials.htmlhttp://oractions.blogspot.com/

Fonts:
http://www.1001fonts.com/index.htmlhttp://www.dafont.com/http://www.abstractfonts.com/
http://www.1001freefonts.com/http://www.kevinandamanda.com/scrapbook/fonts/freescrapbookfonts/http://scrapvillage.com/fonts.htmhttp://www.acidfonts.com/index.htmlhttp://www.fontdiner.com/main.html
http://www.fontgarden.com/
http://www.fontologie.com/free.html
http://www.scrapvillage.com/fonts.htm

Sketches and Templates:
http://www.scrappysketches.blogspot.com/
http://jencaputo.typepad.com/
http://moriginals.blogspot.com/
http://templatesbyerica.blogspot.com

Printing:
http://www.scrappysketches.blogspot.com/
http://www.sbtoshare.com/
http://www.picturepreview.com/

Quotes & Titles:
http://www.annabelle.net/http://www.theperfecttitle.com/
http://www.scrapbook.com/quotes.php
http://www.quotegarden.com/

Actions:
http://www.atncentral.com/http://www.panosfx.com/index.php?option=com_content&task=category&sectionid=4&id=13&Itemid=27
http://oractions.blogspot.com/

More great digi sites:
http://www.blushbutter.com/topsites/
http://www.scrapbook.com/index.htm
http://www.digiscrapsource.com/
http://www.scrapbookingtop50.com.au/digitaltopsites/
http://pifphoto.com/
http://www.the-lilypad.com/store/home.php
http://www.digishoptalk.com

Scrap Inside My Box, Part 2

Sorry I didn't post anything yesterday. My back has been bothering me for the past few weeks. I'm not exactly sure what I did at first to injure it, but I'm sure it probably had something to do with picking up one of my 25 pound toddlers. Yesterday, I re-injured it. I was reaching for my little boy in his crib while holding his sister on my other hip and I felt something pop. After doing some Lamaze breathing (that stuff comes in handy :) ) I spent the rest of the day on the couch as much as my twin toddlers would let me. It's back to bearable today. Hopefully, I'll be able to keep from overusing it long enough for it to heal again.

Enough complaining, and back to one of my favorite topics: scrapbooking! So, day before yesterday I shared my digital scrapbooking "box" with you. Today, I'm sharing my paper scrapbooking "box." :) This is what all my paper scrapbooking LO's would look like if I wasn't careful. :) Hope it gives you an idea or two. Enjoy!


Download Template #8 here.